
In today's fast-paced digital world, email marketing is an essential tool for businesses to reach their customers effectively. However, implementing an email system can be a complex and time-consuming process, especially for developers who are new to the task.
Fortunately, with Sendinblue, sending emails is a very easy task. As a software-as-a-service (SaaS) platform, Sendinblue provides all you need as a business owner or developer to get your emails across to your users very easily.
What Is Sendinblue?
SendinBlue is a software-as-a-service (SaaS) platform that offers an easy-to-use email marketing solution for small, medium, and large businesses. SendinBlue provides a platform that helps companies to grow their relationships with their customers, mainly through email and SMS services.
SendinBlue also offers APIs and tools that allow developers to automate and send emails and SMS. These tools are simple to integrate with Node.js and other programming languages to create customized email and SMS campaigns.
With SendinBlue, businesses can streamline communication processes and reach users or customers more efficiently.
How to Get SendinBlue API Credentials
To use SendinBlue APIs and SDKs, the first prerequisite is a SendinBlue account. SendinBlue provides an easy signup process, and you can create an account on the SendinBlue signup page.
Create an account, enter the required details, and choose a suitable plan in the onboarding process. SendinBlue will then redirect you to your dashboard where you’ll be able to get your API credentials.
To obtain your API credentials, follow the steps below.
- Click on your organization name in the top right corner of the dashboard.
-
Select SMTP & API from the menu that drops down.
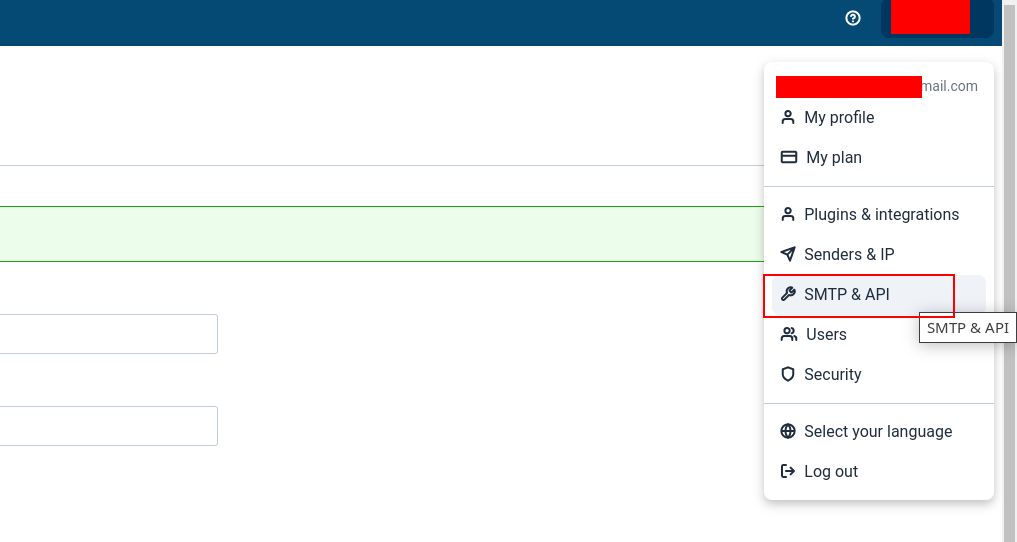
-
Switch to the API Keys tab and click on the Generate a new API key button.
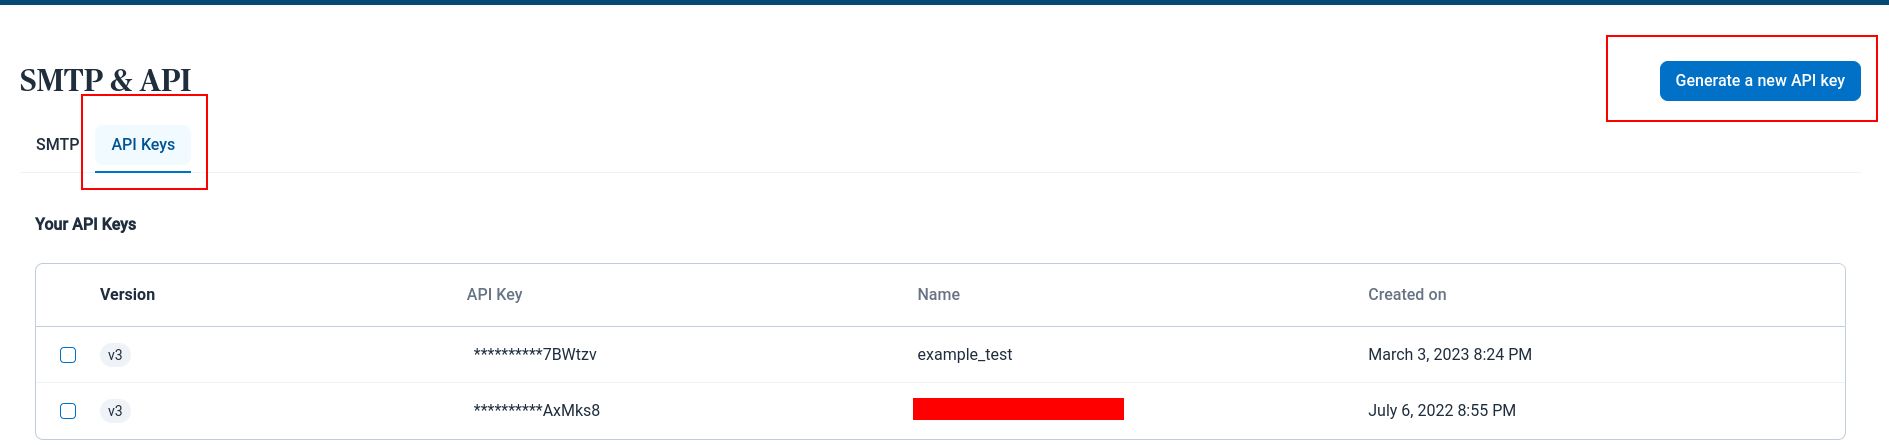
- In the popup that appears, give your key a name, copy the generated string, then store it safely.


This string is your API key and your identity credential which you should store carefully so it doesn’t fall into the wrong hands.
How to Build an Email Sending System in Node.js
Node.js doesn't have a built-in email package like Golang. To send emails, you need an external package like nodemailer or the one that SendinBlue provides.
You’ll also need a working knowledge of Node.js and a Node.js development environment on your machine.
Consider this simple Node/Express application with a /waitlist endpoint:
        // server.js
const express = require('express');

// create server
const server = express();
const port = 3333;

server.listen(port, () => {
    console.log(`server listening on port ${port}`);
})

// create waitlist endpoint
server.use('/waitlist', async (req, res) => {
    try {
        const user = req.body;

        console.log(`${user.fullname} joined the waitlist`);
        res.status(200).json({ message: 'Joined Waitlist successfully' })
    } catch (error) {
        console.error(error)
        res.status(500).json({ message: 'An error occurred' })
    }
})
You can use SendinBlue to send a welcome email to a user who joins the waitlist.
The first step is to install the SDK using npm or any other package manager. Run npm install sib-api-v3-sdk or yarn add sib-api-v3-sdk in your project folder to add it to the project’s dependencies.
After installation, you are ready to start sending emails with just a few more lines of code. On a larger project, you’d probably want to isolate the email functionality in a separate file. However, for this demonstration, you can continue using the same server.js file.
Import the sib-api-v3-sdk package, and set up the SendinBlue client like below:
        const SibApi = require('sib-api-v3-sdk');

// instantiate new SendinBlue API client
const SibClient = SibApi.ApiClient.instance;

// Authentication
SibClient.authentications['api-key'].apiKey = process.env.SIB_API_KEY
 || 'YOUR_API_KEY_HERE';
Next, set up some configuration and create a function to send the welcome emails:
        const transactionEmailApi = new SibApiSDK.TransactionalEmailsApi();

let smtpMailData = new SibApiSDK.SendSmtpEmail();

const sender = {
  email: 'sendinbluemail@example.com',  // your email address
  name: 'Example Sender',
};

const SendWaitlistEmail = async (userData) => {
}
The transactionEmailApi variable stores an object that lets you send transaction emails (as they’re called on SendinBlue). The smtpMailData variable will store the transaction email data you’ll need to send each email: the recipient, content, etc.
Now on to the body of the SendWaitlistEmail function. The following code shows what the function body should look like.
        const SendWaitlistEmail = async (userData) => {
    try {
        smtpMailData.sender = sender;

       smtpMailData.to = [{
            email: userData.email,
            name: userData.fullname
        }];

       smtpMailData.subject = 'You are on the waitlist!';

       smtpMailData.params = {
            'name': userData.fullname,
            'twitter': '@makeuseof'
        };

       smtpMailData.htmlContent = "<html><body><p>Hello {{ params.name }}, "
                 + "welcome to makeuseof.com waitlist. We'll notify you "
                  + "when we launch. Kindly follow us on Twitter "
                 + "{{ params.twitter }}.</p></body></html>";

        // send email
        await transactionEmailApi.sendTransacEmail(smtpMailData)
            .then((data) => {
                console.log(data)  // log the email id
            })
            .catch((error) => {
                console.error(error)
                throw new Error(error)  // handle errors
            })
    } catch (error) {
        console.log('An error occured...')
        console.error(error)
        throw new Error(error)  // handle errors
    }
}
Most of this code populates key properties of the smtpMailData object. In order, these are:
- sender: An object containing two properties: email and name. The code above uses a dummy email address, but you should use a real, working email address for production applications.
- to: This is an array of email recipients. The elements of this array are objects defined with the data (email and name) of the email recipient. You can have up to 50 recipients per message. Technically, it’s possible to send your message to more than 50 at once, but doing so increases the risk of email agents treating it as spam.
- subject: This is the subject of the email to send.
- params: This is additional data that you can use in various parts of your email (mainly the subject and content). You can use values from this params object by enclosing them in double curly braces (i.e {{ params.name }}).
- htmlContent: This property defines the body of the message. It helps to define the message body of the email, which you can format using HTML. It also has an alternative, textContent, which keeps the message body plain.
The email can have more properties, and you can discover them all in SendinBlue’s developer documentation.
Finally, the sendTransacEmail method of transactionEmailApi sends the email and returns the email's ID.
Having implemented the SendWaitlistEmail function, you may call it in the waitlist endpoint. The waitlist endpoint above will now look like this:
        server.use('/waitlist', async (req, res) => {
    try {
        const user = req.body;

        console.log(`${user.fullname} joined the waitlist`);

        // call email sender function
        await SendWaitlistEmail(user)
        res.status(200).json({ message: 'Joined Waitlist successfully' })
    } catch (error) {
        console.error(error)
        res.status(500).json({ message: 'An internal server error occurred' })
    }
})
You may start your application and test your waitlist endpoint in a REST API client, or from the frontend of your application. Here’s an example test request from Postman.

Here is what the received email looks like. Notice that the values from the params object are present.

If you check your terminal, you will also see the messageId printed in the console. You can store this value in a database or log to identify a particular email.
You may also consider checking some tips to prevent emails from going to recipients’ spam.
Although this email system works correctly, having the endpoint directly call the email sender function is not the most efficient approach. It could cause your application to wait unnecessarily while it sends the email. To avoid this, you should optimize the process by implementing a task queue to handle the email workload.
Sending Emails in Node.js Has Never Been Easier
It’s satisfying to realize that you can build a service to send emails in Node.js very easily.
Beyond the scope of this guide, there’s a lot more you can do with SendinBlue. You could send different email versions to different recipients at once, use email templates provided by SendinBlue, configure webhooks to detect actions taken by your email recipients, and view real-time analytics.
You can explore these features by checking them out in the developer portal and implementing them in your Node.js applications.